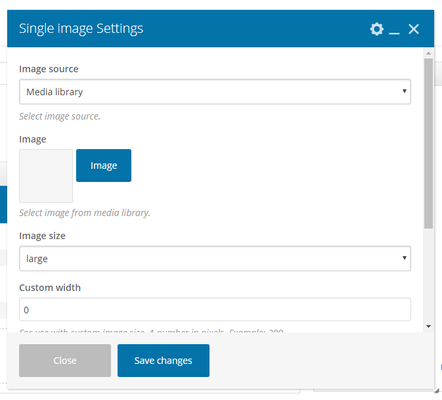
- All users who have access to one/all of the following: pages, blogs, contests, and sidebars
- This is applicable to: All themes
|
- How To Optimize The Single Image element For Mobile Responsiveness: To make images look their best on mobile responsive devices, please select "large" as the image size instead of "thumbnail"
- The 'Single Image Widget' can upload Jpgs, Gifs and Pngs
|
Step-by-step guide
- Image Source: Choose 1 of the following:
- Media Library: Allows you to upload an image from the media library. If selecting this option please see steps: 2&3, 6-10
- External Link: Allows you to paste the image URL into the page or blog. If selecting this option please see steps: 4-10
- Image: Click on the 'image' button to upload an image from one of the following:
- From Computer: upload an image from your computer
- Media Library: choose an image already uploaded to the media library
- Stock Image: Select a stock image. For more information on stock images rules & use please see: Stock Image Library Overview
- Image Size: The image size will automatically default to 'large'. Although you can choose from any of the following:
- Thumbnail
- Medium
- Large
- Full
- Custom
- External Link: Add the image link/URL here
- Caption: If you want to add a caption to your image, add it here. It should display underneath the image
- Custom Width: For use with custom image size. A number in pixels. Example: 200
- Custom Height: For use with custom image size. A number in pixels. Example: 200
- Image Link: Enter url if you want to link this image with any url. Leave empty if you won't use it
- Link Target: Choose whether you want the image to open in the current window or a new window
- Click the Save button

Related articles
Related articles appear here based on the labels you select. Click to edit the macro and add or change labels.

Save
Save
Save
Save
Save
Save
Save
Save
Save

